Thursday, February 26, 2009

the Beehive

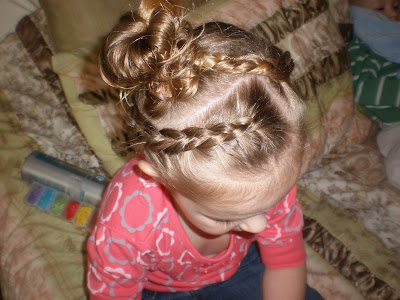
I don't know why I didn't take pictures for each step - but you get the idea with the few that I have. It kind of looks like a beehive so that's what we're going to name it today. I realize I've done a lot of braiding lately, especially inside-out french braiding. It's just so fast & easy for me to do & so many options. So if you haven't learned how to do it yet - watch the video tutorial below & for those who have - keep practicing because it gets easier everytime.

I've still had quite a few people email me or comment asking how to do the flower bun. Once again, if you click on the labels list, click on "Tutorials" & scroll down until it gives the step by step picture directions of how to do it. Hope that helps those who are still confused!!

I parted the hair all the way around the head, like a headband. What was left in the middle I pulled into a pony tail so I would not include it in my braid. Then I started inside-out french braiding at the front where we normally would part her hair. Braid all the way around the head, making a complete circle.
It was really easy to do, I just had to manuever my body around hers since she likes to sit in one place. When you get to the end, keep braiding to the ends of the hair.

I brought the hair that was left in the middle to a high side pony. Then did our messy bun on top.

I added a bow to the side pony (sorry I didn't take it right after I put it in - this is the best you get but you get the idea)


Taraji P. Henson: Medium Length Wedding Do

Taraji P. Henson: Medium Length 'Do


Actress Taraji P. Henson wore this medium/short hairstyle for the Oscars.

Monday, February 23, 2009

Hollywood Hair...Jennifer Aniston at the Oscars

I have a secret. I watch the Oscars and Emmy's. Not to see who wins, but to see their hair. Last night's favorite was Jennifer Aniston. She was beautiful! LOVED her hair, it wasn't over done or swept back into an updo that wasn't her at all. It was simple and fresh.


This morning we did her style on my oldest. She is getting past the point of piggies and wants her hair down and older (WAH!) so this style fit the bill.


All we did was part the hair at an angle from above her eye to her crown. About an inch and a half up the part, I parted her hair again to the other side. I pulled the extra hair into a ponytail so I didn't inadvertently pull excess into the French braid. I sprayed the hair with water and hairspray and braided down like so. I secured the braid with an elastic and then to make sure it didn't move, I threaded a bobby pin through the elastic and up through the underside of the braid.


Then I pulled the ponytail out and ran my flat-iron through pieces of her hair to give it some "UMPH"

How'd we do?

Coming up next:

Nancy O'Dells Golden Globes Hair

Vanessa Hudgens

Wednesday, February 18, 2009

inside-out frenchbraid tutorial

Here's the Inside-Out Tutorial I said I would post. Once again - don't mind the voice - yep still hate it when I hear it on here. Hope it helps. If any of you still have questions - don't hesitate to ask. I hope you can see well enough my hands are kind of in the way. Someone needs to tell my husband he needs to learn how to film better:) But it works!!

This is what the braid should look like when you are finished:

Thursday, February 12, 2009

quadruple french braids

This is just a fun little twist on your 2 french braids. 
First, part the hair in the front & inside-out french braid all the way down. 
Do the other side the same. 
I did a zig-zag part & then started about an inch down just inside-out french braiding. When you get to the bottom, connect the two braids together. Do the same on the other side. 
Once you've finished, I connected the two braids at the base of the head so that the first braid wasn't distracting & moving around alot. It would be cute to add a bow there. 
You're finished!!

Hearts take three

I can't go off and enjoy all of the lovey dovey romance I have planned for my family without leaving you with one final style.


Super simple, remember those twists I did a couple of posts down? Simply do the same thing, only make sure that your final twist goes away from the crown. The secret here is in the parting. Start in the middle of the head and swoop forward in a curve towards the ears. Twist and secure and tie a romantic ribbon to the bottom. I should have grabbed a picture, but she is wearing some of her sisters babylegs that are black and pink stripes with hearts. LOVING the hearts!!!


Happy Valentine's Day!
XOXOXO

Stephanie

Wednesday, February 11, 2009

Sharing your hearts

Thank you all so much for the wonderful comments about the hearts. I appreciate each and every one of them.

I have received some e-mails with pictures of some of the hearts you have come up with. Keep them coming! I want to see how many heart hairstyles I can get on this post!

This first one is from my friend that I have had since we were sophomores in high school. Our timing on everything is pretty consistent. Weddings were 20 days apart (she was my maid of honor, I her matron), first and last babies were within weeks of each other, we even live four miles apart. I love her. This is her sweet chocolate covered K girl. Look at how cute her hair is! She did the knot the opposite way of normal and proceeded to do a heart with little clips! Brilliant! It gives you so much control over the shape of the heart!


Thanks Itybtyfrog!

Next is one I received from Kelly. She tried the heart on her little Jillian. SO cute! Next time I will try the hot pink ribbon! I love the way it makes her hair POP!


Ammy had a great idea if you don't have a long enough ribbon, just twist the halves into ropes and secure into a ponytail! SO CUTE!


Perfect timing! My sweet little neighbor Naomi came over to give Tess a Valentine and I snagged a picture of her on my front porch. She looks so cute with the snow melting on her hair. Her mom pulled all of her hair into a ponytail and did an upside down knot and then rope twisted the hair and held it into place with cute little clippies! Thanks Naomi and Kera! (Kera does all sorts of fun things with her daughters hair...you will probably be seeing some more of her ideas regularly on here).


Check out how cute this one is! Becky did a puffy braid heart with just the top portion of the hair. Darling!


Cindy has been super busy with her daughter Paige. These are TWO heart hairstyles they have done recently. SO CUTE! Thanks ladies!


Debbee did a beautiful heart framing her daughters pretty blonde hair. Thanks Debbee!


Keep those pictures coming ladies! It does my heart good! Blackeyedsue2@gmail.com

Natural Updo


Courtesy of NajwaMoses

Tuesday, February 10, 2009

Miss Tess as Fancy Nancy


A while back, Tess was invited to a Fancy Nancy Gala with some of her best girls. She needed to get all dolled up and wanted her hair the way Nancy wears it way up high on her head. We had a problem, the underside of Tess's hair is short...way too short to be pulled up so high without most of it falling down within an hour.

A concocting we went.

First I combed most of her hair as high as it would go and I parted it across her hair from earlobe to earlobe. I pulled that section into a ponytail and flipped it into a knot where the hair came out the top instead of the bottom.


Then I parted another section from the top of the ear to the top of the other ear and pulled it into a ponytail as well. I also picked up the first ponytail and put it in with this new ponytail. Before I secured it with an elastic, I pulled some pieces out. Then I flipped that ponytail into a knot as well.


I pulled the rest of the hair and this ponytail together. As before, I pulled pieces out of the ponytail and secured the ponytail WAY up high.


Now, curl all of those pieces that you left hanging down. Just so you know, the bottom pieces when we did it THIS time were a little wonky. The first time I did this, I left longer pieces down, which is what I would advise doing.


Now, add your elastic tied with a bunch of organza ribbon (or bow or whatever is FANCY in your house) and fluff all of those curls.


Fish Tail Flip


Start by sectioning the front of the hair where you will start the fish tail braid. 
You are going to fish tail braid the hair & pull the pieces from the sides (like you would a french braid) instead of just the sectioned part. It's super easy. Just pull a piece from the side & cross it over, continuing until you've gone down as far as you want. 
This is what it should look like. Section it off with an elastic. 
Pull the rest into a pony, including the fish tail. FISH TAIL BRAID the pony tail. 
Flip it up & secure with an elastic, having the ends stick out of it. 
I added some ribbon & then sprayed the ends with there stick out & rolled the hair over my fingers to give it a flipped look with the ends (instead of having to pull out my curling iron). That's all there is to it.