Thursday, February 28, 2013

Make a Boho Braided Side Bun For Hair

Make a Boho Braided Side Bun For Hair
How to Style :
  • Step 1 : Part your hair asymmetrically, and begin French braiding from the temple of the side of your head with less hair to directly beneath your ear on the opposite side.
  • Step 2 : Continue braiding down like normal for an inch or two, and then tie off the end with a clear elastic hair tie.
  • Step 3 : Using a curling iron, wrap the rest of your hair away from your face to create loose, summery beach waves.
  • Step 4 : To balance out your French braid, grab a few random pieces from the opposite side of your head and do a loose twist.
  • Step 5 : Join the French braid and twist together to fashion a very organic, boho chic side bun.
  • Step 6 : Secure your bun with several bobby pins, and to add a bit of texture, spray your updo with Hairspray. et Voila!
Source : A Boho Braided Side Bun 


Tutorials You Should also see :
3 Steps To Easy Breezy Beach Waves
how to make hair chalking on dark hair
beautiful Side braid
How to make Double Side Braid For Hair
Make a beautiful braid for your hair

Wednesday, February 27, 2013

Foundation!

Foundation! Foundation!! Foundation!!!

Got foundation issues??


Do you really need a primer?


Warm, Cool or Neutral


Foundation Shade


Foundation For Your Skin Type


3 Steps To Easy Breezy Beach Waves

3 Steps To Easy Breezy Beach Waves
How To Style : 
Step 1 : Start with wet hair and a great product to help work some wave into your mane.
 =====> Paul Mitchell's Ultimate Wave Beachy Texture Creame-Gel really does the trick for my hair. I also use their Twirl Around Crunch Free Curl Definer when I need some extra curl.
Step 2 : Next just scrunch your hair a few times. Not rocket science, I know.
Step 3 : A little blow drying with a diffuser makes it extra luscious. Tousle your waves and that's really all there's to it.
Source : indian summer


Tutorials You Should also see :

  • how to make hair chalking on dark hair
  • beautiful Side braid
  • How to make Double Side Braid For Hair
  • Make a beautiful braid for your hair
  • Make a Medieval Braid For Your Hair

  • Romwe White Valentine’s Day Sale:


    Double Discount:  Up to 70% OFF+ Extra 15% OFF $65 (Code:  whitevalentine)
    From 02/28/2013 to 03/05/2013

    Don't Miss It! 

    Tuesday, February 26, 2013

    how to make hair chalking on dark hair

    how to make hair chalking on dark hair
    How To :
    1. - Start with clean hair and section off the bottom half, securing the top half with a clip.
    2. - Take a small section of your hair and twist the hair. Mist the section with a water bottle.
    3. - Take your soft chalk pastel stick and rub over the section while twisting the strand back and forth. Repeat over as many sections as desired.
    4. - To get the color to stick around, run a flat iron or curling iron through your hair, then spraying with a light hair spray.
    5. - Be creative after chalking your hair! Style in a messy bun or braids to show off the vibrant colors! 
    Source : How To... Master Hair Chalking

    Tutorials You Should also see :

    Sunday, February 24, 2013

    beautiful Side braid

    beautiful Side braid
    beautiful Side braid

    Tutorials You Should also see :

    Saturday, February 23, 2013

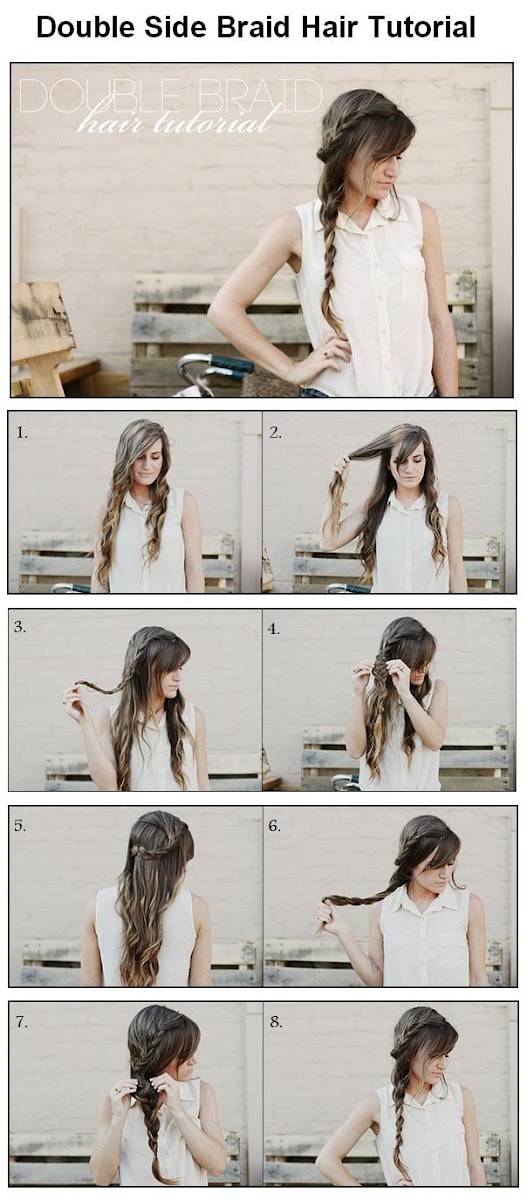
    How to make Double Side Braid For Hair

    How to make Double Side Braid For Hair
    Steps :
    1. Begin with your hair down.
    2. Take a section of your hair from the thicker side of your part.
    3. Then braid it all the way down. It will lie flat on your head best if you angle it back as you're braiding it.
    4. Next, using a technique Elsie and Sarah taught me here, slightly tug all along the braid, making it appear thicker.
    5. Once the braid is complete, pin it on the back/far side of your head underneath the top layer of your hair, covering the bobby pins.
    6. Next, braid the rest of your hair into a side braid.
    7. Continue with the same process as the first braid, slightly tugging along the whole thing.
    8. If it

    Tutorials You Should also see :

    Friday, February 22, 2013

    Make a beautiful braid for your hair

    Make a beautiful braid for your hair
    Make a beautiful braid for your hair


    Tutorials You Should also see :

    Thursday, February 21, 2013

    Make a Medieval Braid For Your Hair

    Make a Medieval Braid For Your Hair
    Make a Medieval Braid For Your Hair

     Source : MEDIEVAL BRAID

    Tutorials You Should also see :

    Wednesday, February 20, 2013

    Make a Ringlet Headband

    Make a Ringlet Headband
    Source : Make a Ringlet Headband


    Tutorials You Should also see :

    Tuesday, February 19, 2013

    12 Beautiful Chignon Hairstyles

    12 Beautiful Chignon Hairstyles for wedding


    Tutorials You Should also see :

    Monday, February 18, 2013

    How to make half braid for your hair

    How to make half braid for your hair
    How to make half braid for your hair


    Tutorials You Should also see :

    Sunday, February 17, 2013

    Get Your Own Hairdressing Home Tutorials For Life!

    Now YOU Can Learn How To Cut & Style Hair Easily In 2 Hours or Less... With The Ultimate Home Hairdressing Course

    Are you looking for an easy way to learn hairdressing and styling?
    If you're ready to discover the secret techniques to dressing and styling hair, no matter if you're a beginner or a professional and without paying expensive prices for personalized tutoring, then I've got just what you need.

    Tutorials You Should also see :

    Feed back welcome!


    Hi all! Soooo I have a special occasion on Wednesday and I have the shoes, the dress and the bag but I have NO idea how to do my makeup! 

    Those are my favourite looks above!

    Here is the dress:


    Please let me know what you would pick!

    Much love Sinead xx

    How to make a Messy French Roll

    How to make a Messy French Roll
    Source : Tutorial: How do you do that hair-do you do ;)


    Tutorials You Should also see :

    Saturday, February 16, 2013

    Hair Myth


    5 Hair Myths – Busted! 
    Bad Ideas Won’t Solve Bad Hair Days, Says Expert

    Misinformation can be just as stubborn as frizz or those pesky flyaways – it’s difficult to manage, impossible to reason with and it just keeps coming back, says longtime hair-care advocate and health scientist Audrey Davis-Sivasothy.
    “Old wives’ tales and ineffective products that claim to treat or rehabilitate hair often have a placebo effect because people want them to work,” says Davis-Sivasothy, author of “Hair Care Rehab,” (www.haircarerehab.com). “But many of these ideas and products actually do the opposite of what’s intended, and they delay the user from seeking out real solutions.”
    Davis-Sivasothy debunks the following common hair-care myths:
    • Myth: There’s a magic pill (or oil, serum or balm) to grow our hair faster, stronger or thicker. Unfortunately, no. Hair growth is genetically predetermined and controlled by our hormones. Unless the magic pill affects our genes or hormones, there’s no hope that it might make our hair grow. (This includes prenatal vitamins. Credit the upsurge in hormone levels during pregnancy for those vibrant tresses!) Basic vitamin supplements can offer slight improvements in hair quality, but only if our body truly lacks the particular vitamin or mineral being taken.
    • Myth: Trimming will make your hair grow stronger, longer, faster or thicker. Since hair is dead, cutting the ends has no effect on what happens at the scalp. Strands will grow at the same predetermined rate each month, and individual strands will grow in at the same thickness as before. While trimming or cutting the hair does seem to give the appearance of thicker hair, this is only because all of the freshly trimmed hairs now have the same, clear endpoint.
    • Myth: Expensive products do more! Not necessarily. Always look for ingredients over brand names. There are just as many poorly formulated high-end products as there are bargain ones – and just as many worthy expensive products as there are bargain ones, too!
    • Myth: Products made for or marketed to (insert race/ethnicity) cannot be used by those of other backgrounds. False! The ingredients in a product matter much more than to whom the product is marketed. In fact, most products have the same set of three to five base ingredients. Products for “ethnic” hair types tend to be more moisturizing and have more oils and proteins than those for other hair types. Damaged hair needs a good dose of moisture, proteins and oil to regain its healthy appearance. The same holds true for products marketed to those with color-treated hair. Even if your hair is not dyed, using a product for color-treated hair can be beneficial because these shampoo formulas tend to be gentler (to preserve easily washed away hair color) and conditioners tend to be super-conditioning, but lightweight, to help reduce dryness from the coloring process.
    • Myth: Washing your hair too often leads to dryness. This depends. Hair can be cleansed as often as you like without dryness, provided you use the proper products to retain moisture. Those who generally have naturally drier hair types (including those of us with curls and highly textured hair) often shy away from frequent cleansing – but water is not the enemy! It’s the stripping shampoos and mediocre conditioners we use that are to blame. Using the proper moisturizing and conditioning products at wash time will actually increase your hair’s hydration.
    About Audrey Davis-Sivasothy
    Audrey Davis-Sivasothy is a Houston-based freelance writer, publisher and longtime, healthy hair care advocate and enthusiast. Sivasothy holds a degree in health science and has written extensively on the science of caring for hair at home.

    beautiful Long colored hair

     beautiful Long colored hair
    beautiful Long colored hair


    Tutorials You Should also see :

    Friday, February 15, 2013

    6 different Ponytails hairstyles

    6 different Ponytails hairstyles
    6 different Ponytails hairstyles

    Tutorials You Should also see :

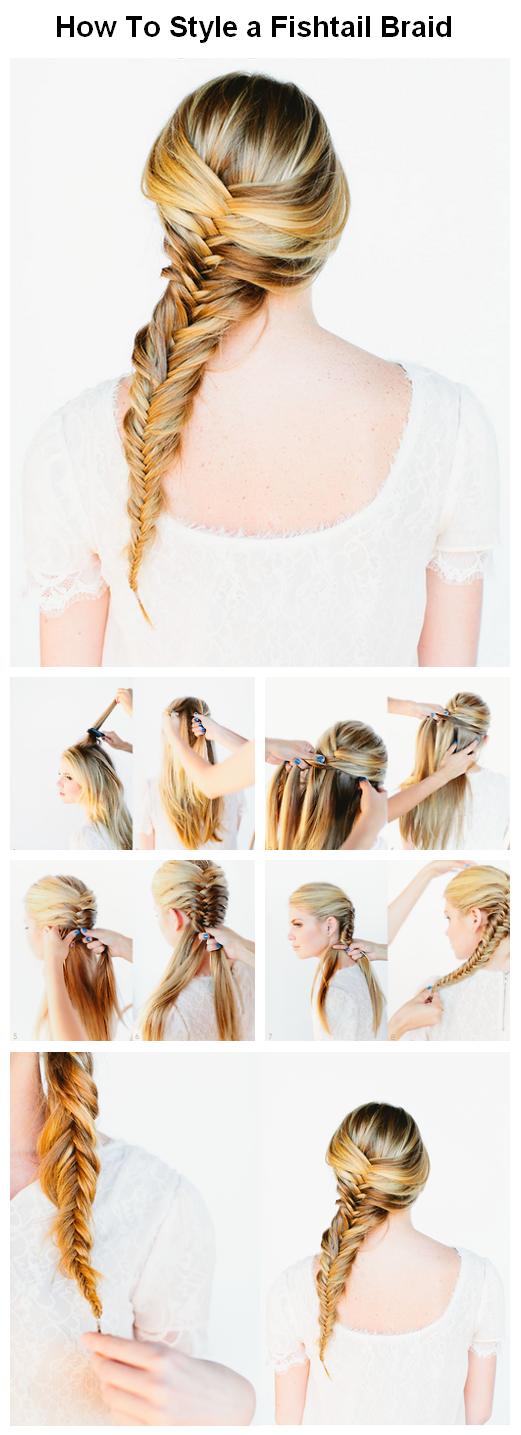
    How To Style a Fishtail Braid

    How To Style a Fishtail Braid
    Steps : 
    1. Backcomb/tease the crown of your head. This makes the hair “sticky” for starting the fishtail.
    2. Gather a small handful of hair from the back center of the head and separate the hair into two sections.
    3. + 4. Take a small strand of hair from the right section, pull it back and cross it over to join the left hair section.
    5. + 6. Take a small strand of hair from the left section, pull it back and cross it over to join the right hair section.
    7. Repeat these steps all the way down the back of the head. Continue throughout the “tail”.
    8. Secure with hair tie. Fishtails looks beautiful a little disheveled. To achieve this look gently pull apart/loosen the braid. It’s ok if it’s uneven or little pieces falls out. Gives the fishtail a youthful, messy ease.


    Tutorials You Should also see :

    Thursday, February 14, 2013

    Hot Valentines Hairstyles

    Hot Valentine’s Day Hairstyles – Tips from Cristophe Salon Newport Beach

    Valentine’s Day is just around the corner and you’ve got everything down; you know exactly where you’re going on your date and what you’ll be wearing. There is just one detail you cannot forget - gorgeous looking hair! To ensure your hair looks stunning on this holiday of love, Scott and Jennifer Fontana, owners of Cristophe Salon Newport Beach, have three hot looks to perfectly compliment your romantic night in or out!

    Hot date night going out:

    This look is big and sexy. Parted to one side or down the middle, this hot date look is accompanied by lots of beautiful, sexy waves and volume.

    -          Products you will need: The Scott Fontana Collection Volume Mist, Max Mousse, a one-inch curling iron or wand, the Scott Fontana Collection Argan Oil Infused Nourishing Serum and Free Hair Spray with a light hold.

    Here are the steps for your hot date night hair:

    When you wake up, wash and condition your hair, then towel dry and run a detangler through it. Next, spray your roots with the Volume Mist and apply Max Mousse through the ends. Then, blow dry your hair upside down, which creates a more voluminous look.  Next, take a round brush and continuing blow drying your hair to smooth out the ends, but make sure not to brush your roots. Once your hair is fully dry, take your one-inch iron and start curling large sections of hair.  Once you have curled all your hair, run your fingers through it to break up the curls and create movement. Using just a dime size amount of serum, apply it to the ends of your hair with your fingers. This will give the hair incredible shine and calm done some of those flyaways. Flip your hair upside down and spray your roots to give it some extra hold, flip your hair back and apply one last spritz to the front and you’re set!

    If you don’t have time to curl your hair in the morning, when you leave for work pull your hair into a ponytail on the top of your head.  As you are getting ready to leave for your hot date, take it out of the pony tail, plug in your curling iron and curl your hair.  Spritz with your travel size hair spray and you have gone from serious to fun!

    A romantic night in:

    We call this the classic Hollywood glamour look.  The main player is soft, beautiful waves that give your hair a 40's style look. This style is versatile and can be worn with long or short hair.  If you have long hair, pull part of it up so it becomes medium-short length and apply some soft waves. When you’re ready to turn up the heat and get your romance on, let your hair down and it turns into a long sexy soft classical look.

    -          Products you will need: The Scott Fontana Collection Maximum Mousse, Sweet Serum, Shine Spray and Free Hair Spray. You will also need a curling wand, small clips and a few bobby pins.

    Here are the steps for your romantic date night hair:

    In the morning, after washing and conditioning your hair, run a detangler through it. Apply Maximum Mousse to your whole head from the roots to the ends and then top with a small amount of Sweet Serum over the mousse. Next, flip your hair over and blow dry it upside down for additional volume, using only your hands and fingers and then flip your hair back up and use a round brush to smooth out the ends. Using your curling wand (not curling iron), take big sections of hair, elevate it to the top of your head and wrap it around the curling wand with your fingers for approximately 45 seconds. Next, take your hair off the curling wand, keep it curled in your hand and using small bobby pins, clip the curl to your head. This will allow the curl to cool down and set. Repeat this process all over your head and once you have completed the curling and clipping, spray all the clipped curls very lightly. Let the spray dry for a minute then start removing all the clips from the curls.

    Spray a little Free Hair Spray on a natural boar bristle flat brush and starting at the top of your hair and brush your hair out through the ends. Inside tip: the spray on the brush will keep the hair together. Keep brushing it and running your fingers through the hair until you create those soft, sexy waves. To pin it up, take the hair at the bottom, wrap it around your fingers and pin it up underneath the hair on top, leaving some soft long pieces around the face. Spray some Shine Spray over the entire head for shine and perfume, and finish it off with just a touch of Free Hair Spray.

    As you are getting ready to leave work pull out your travel size Free Working Hair Spray, curling wand and some bobby pins to freshen your look.

    Night out on the town with girlfriends:

    This look features quick, light waves just around the face and on your ends. Nothing too big, instead gives you a very natural night-out look.

    -          Products you will need: The Scott Fontana Collection Fresh Do Dry Shampoo, Locked Up Finishing Spray and a large one-and-a-half inch curling iron.

    Here are the steps for your night out hair:

    This style works better when the hair is a little dirty and not so soft, so if you can go without washing your hair the night before this hairstyle will hold better. In the morning, spray in the dry shampoo all over the entire head, from roots to ends. Take medium size sections, brush them out gently and with your curling iron curl the section by rolling it back towards the back of your head. To note, when creating this style it is not necessary to lift the hair up high while curling. Repeat the same steps in sections all around your face and the bottom of your hair in the back. If your hair is layered, be sure to curl the longer layers. After you have finished curling, run your fingers through the hair very lightly just to loosen the curls. Then, spray the curls and entire head with the Locked Up Finishing Spray so the curls hold and won't fall out by the end of the night.

    For your quick touch up at the office you will need a travel size of the Locked Up Finishing Spray and a one-and-a-half inch curling iron. Follow the step by step directions to create this look in the office bathroom. It's a quick fix for a fun night out on the town with your girls.


    For these and other great tips be sure to “Like” Cristophe Salon Newport Beach on Facebook and “Follow” them onTwitter!  For more information about Cristophe Salon Newport Beach, please visit www.cristophenb.com.