Monday, May 13, 2013

How to give yourself a Wavy Hair style

How to give yourself a Wavy Hair style
How to curl your hair :
  1. Always curl the hair away from your face.
  2. Wrap the hair around the curling iron {see in the last picture how to hold your arms and the curling iron}
  3. Hold for about 5-8 seconds.
  4. Don’t use hairspray until the end. Too much hairspray will make them fall out.
  5. It works better when you have layers cut in your hair. I have about collar bone length layers
Buy curling iron from amazon.com

You Should also see :

Sunday, May 12, 2013

Make a fishtail braid for your hair

Make a fishtail braid for your hair

You Should also see :

How To Make a Crown Braid

How To Make a Crown Braid
How To :
- Start by dividing your hair into two sections. Braid the first section all the way down to the end.
- Bring the braid over your head, covering your ear.
- Secure the braid in place with bobby pins. use four to five pins per braid. Place the bobby pins behind or under the braid.
- Braid the second section of hair all the way down to the end.
- Bring the second braid over your head so that it covers the end of the first braid. Tuck the end of the second braid behind the first.
- Pin down the braid so that it's secure.
- Use bobby pins to tidy up any loose pieces of hair. And your done!

    Source : teenvogue.com

    You Should also see :

    Friday, May 10, 2013

    No Heat Headband Curls Tutorial

    No Heat Headband Curls Tutorial
    Beautifully curled hair without the use of a curling iron is easier than ever. All you need is a stretchy headband and a set of hands! Learn how to get low maintenance, no heat, voluminous curls.

    Source :sorellasalon

    You Should also see :

    Make a Gorgeous and Bouncy Waves Hairstyle

    Make a Gorgeous and Bouncy Waves Hairstyle
    Steps :
    • Step 1 & 2 : Take freshly washed and slightly damp hair and pin at top of your head. Take a small section and start roling the hair up to the root. then pin the hair useing Tin Foil.
    • Step 3 : Once you finish the bottom sectio, release a new section from the pinned hair and continue as before. Do this until all the hair rolled and Tin Foiled in place.
    • Step 4 : Use a flat iron to press each roll flat.
    • Step 5 : as your taking the tinfoil off if toy notice that you forget to press one of the rolls simple pin it back up and press before letting it out again.
    • Step 6 : spritz on a little hair spray and you're done!
    You Should also see :

    Thursday, May 9, 2013

    Honestly...


    If I was truly honest with myself I would want to 
    look less like me and more like that!


    I want:
    A smaller nose
    A thinner face
    A shorter forehead
    Large lips
    Biggers eyes
    Darker skin
    Thicker hair
    and that's just my face don't get me started on my body!!

    I have no idea why I feel the need to change the things I do,
    Why don't I want smaller eyes or thinner lips, Who knows!

    We all see beauty differently, We all think different things are beautiful but it doesn't matter what we think is beautiful as long as we look in the mirror and find beauty in ourselves.

    Sure I would want to look like that, But I look like me and that's okay too.

    Remember to find beauty in yourself, 
                                                                 Sinead.


    Tuesday, May 7, 2013

    Benefit Fake up Review

    Cake up Fake up!!

    Flakey Skin? Dry Patches? Dehydrated Lines?

    Stop your makeup caking up
    Start using fake up by Benefit!


    A creamy concealer with a ring of vitamin E & 
    Apple seed extract moisturizer - Covers and hydrates!

    With it Available in three shades - 01 Light  02 Medium  03 Dark


    Many uses:

    Under Eyes - Doesn't set in fine line.
    Dry Patches - Blend in the direction of the flakes to help them disappear.
    Smile Lines - Rehydrate caked up facial lines.
    Lips - Blur lip lines and pigment without drying out the skin.


    Want to learn more check out my video - Coming soon...


    Make a Twisted Side Ponytail

    Make a Twisted Side Ponytail
    Make a Twisted Side Ponytail
    This twisted side ponytail is a perfect everyday hairstyle when you are on the go. All you need is a hair elastic

    Source : abeautifulmess.com
    You Should also see :

    Saturday, May 4, 2013

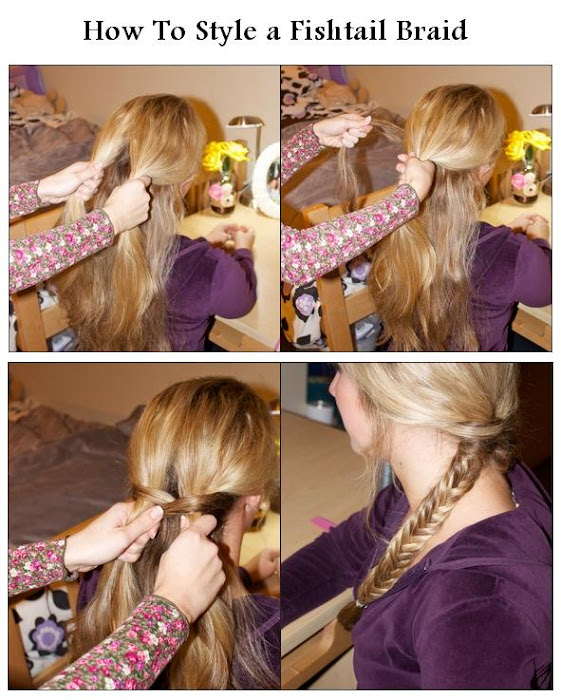
    How To Style a Fishtail Braid

    How To Style a Fishtail Braid
    Steps :
    • Step 1 : Divide the top part of your hair into two sections.
    • Step 2 : Grab a 1/2 inch strand of hair from the left side and bring it to the right side. Pull tight. Next, grab the same thickness of hair from the right side and bring it to the left side, making sure to keep each side separate from one another. Pull tight. Do this without twisting hair under like a braid. This is simply moving one small section of hair to the opposite side.
    • Step 3 : Keep repeating these steps until you run out of hair.
    • Step 4 : Once your done, secure with an elastic and you can pull out a few strands and curl them or crimp them or whatever you feel like doing, just to give it a more relaxed look.
    Source : michaelanoelledesigns
    You Should also see :

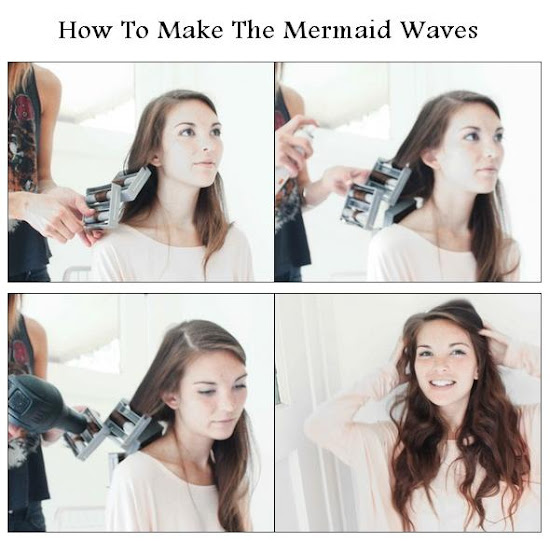
    How To Make The Mermaid Waves

    How To Make The Mermaid Waves
    Steps :
    • Step 1 : Divide hair into 4 sections, seperarting the front from the back, and add wave clips to the bottom half of the hair.
    • Step 2 : Spray the hair with Hair Resort.
    • Step 3 : Blow dry for 5 minutes of high heat, low blow. Then 1 minute on cold to set the waves.
    • Step 4 : Remove the clips, shake it out, add hairspray and backcombing for a little extra beach mess.
    Source : treasuresandtravels
    You Should also see :

    Spring Nail!


    I like to start with a light sheer colour on my nails to begin with 
    and I love Oxygen By China Glaze.
    I apply a really light sheer coat before I apply my colour.

    Colour:
    Two of my favourite colours at the moment - 

                   "Rose Libertine" By Rimmel                         "How do you lilac it" By Rimmel 


    As much as I love these shade  I ♡ them even more 
    When I apply Innocence by China Glaze 
    over the top! 


    Which got me thinking, do you layer your polishes to create your own unique shade?? 
    and if you had

    to give your shade a name what would you call it??

    Friday, May 3, 2013

    Wavy Twisted Half Updo Tutorial

    Wavy Twisted Half Updo Tutorial
    Steps :
    - After curling your hair, part your hair normally, and grab your hair like you would be putting it half-up.
    - On one side of your part, take your grouping of hair and split it up into three sections.
    - Take the first section and twist it to the back of your head, insert bobby pin.
    - Take the second section, braid it to the back of your head, insert bobby pin.
    - Now, twist your last section of hair to the back of your head, and insert bobby pin.
    - Repeat on the other side of your head, and you are good to go!

      Source : myshineproject.com
      You Should also see :

      Thursday, May 2, 2013

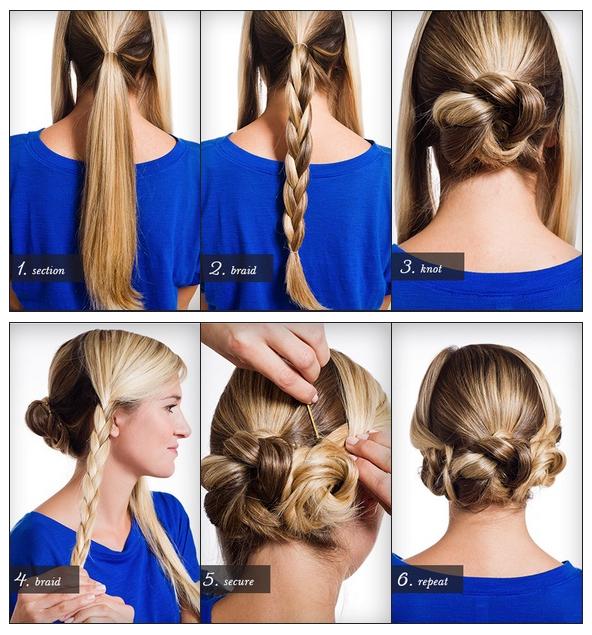
      How To Style a Triple Braided Bun

      How To Style a Triple Braided Bun
      Steps :
      • Step 1 : Section hair into three vertical sections and pull back section into a ponytail.
      • Step 2 : Braid ponytail and secure at the end.
      • Step 3 : Tie braid in a knot and tuck the tail behind the knot. Secure with a bobby pin.
      • Step 4 : Braid side section and secure at the end.
      • Step 5 : Pull braid towards the back bun and tie in a knot. Again, tuck the tail behind the bun and secure with bobby pins.
      • Step 6 : Repeat steps 4 & 5 with final section and spray all over.
      Source : camillestyles.com
      You Should also see :

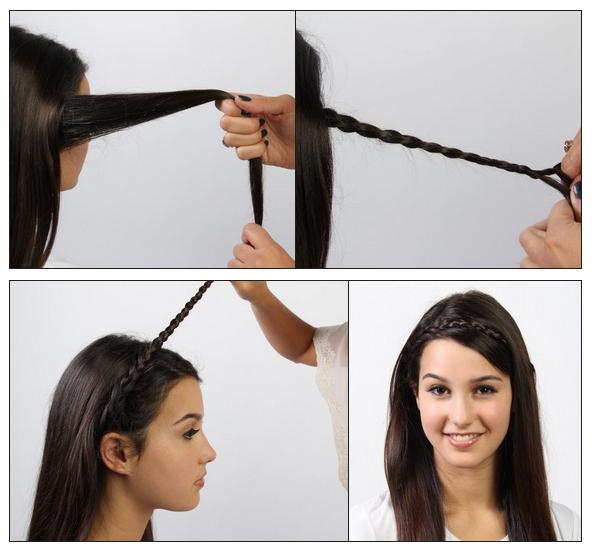
      Braided Headband Hairstyle

      Braided Headband Hairstyle
      Steps :
      - Pull a section from the front of your head away from the rest of your hair.
      - Braid the entire section of hair.
      - Take the braid and wrap it around your head. Pin it to the side of you head with a bobby pin.
      - And you're done!

        Source : blog.debshops.com
        You Should also see :